File System Programming Guide(iOS)
About
sandbox机制让文件系统使用起来稍微有点不同,特别是访问别的app内容的时候需要取得对应的权限。同时sandbox机制基本明确了文件的存储位置。
该手册涉及内容:
- sandbox文件系统规范
- 多线程/进程文件读写(
NSFileCoordinator、NSFilePresenter) - 文件类型及对应的读写方式
- 使用高级文件系统API
- 通用文件管理界面(如
Open and Save panel) - 异步读写文件
- 模仿Finder操作文件
- 优化文件相关操作
- 关于
File Mapping和Directory Localized Name(OS X)在《File System Advanced Programming Topics》
File System Basics
iOS直接使用UNIX分层文件系统并针对app实行sandbox机制。
About iOS File System
Every App Is an Island
sandbox机制下的iOS app没有权限直接和UNIX文件系统打交道,而是只能在其sandbox里面限定的几个container里面操作。
container根据其功能划分,具有不同的特性。这些container在app安装的时候自动创建。
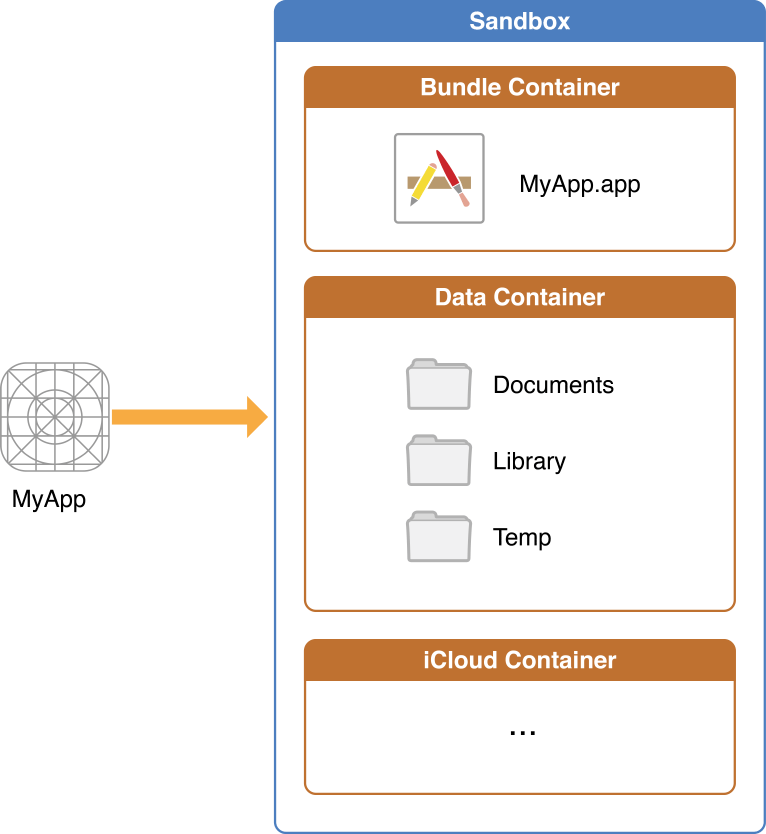
app还能访问一些公共资源,如用户相册,音乐。
iOS Standard Directories: Where Files Reside & Where You Should Put Your App’s Files
| Directory | Description |
|---|---|
| AppName .app | app bundle。包含app主体和自带的相关资源。 不可写。不会被iTunes Backup。 |
| Documents/ | 存储用户使用过程中产生与用户相关的重要数据。该目录里面的文件可以直接被用户share(对用户可见)。 会被iTunes Backup。使用 -[NSURL setResourceValue:forKey:error:]方法可以防止被Backup。 |
| Documents/Inbox | 存放从别的app传过来的文件。可以读取/删除文件,但是本app木有创建/修改权限。如果app必须修改里面的文件,只能把它移出来。 会被iTunes Backup。 |
| Libaray/ | 非用户数据存放地方。``Application Support(hidden)和Caches`文件夹被放在这里。当然你也可以创建其他子文件夹。除了Caches文件夹,其他默认都会被iTunes Backup。 |
| tmp/ | 和UNIX的tmp目录一样。app运行时不清空。系统会隔一段时间自动清空该文件夹。 不会被iTunes Backup。 |
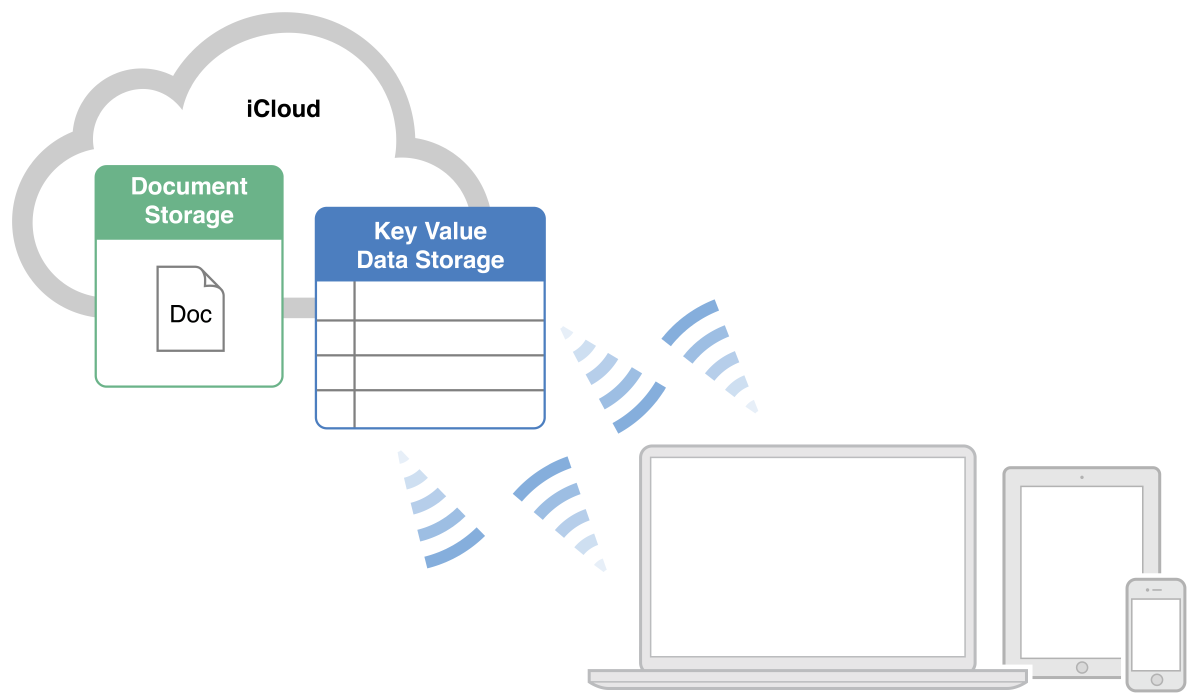
The iCloud File Storage Container
iOS app可以在iCloud里面有一个对应的文件夹保存数据。其中用户相关数据方法Documents/目录下,对用户可见。其他数据会被封装为一个Data文件。
iCloud上保存的内容和用户设备里保存的内容同步。
支持key-value pairs存储。
How the System Identifies the Type of Content in a File
- UTIs(Uniform Type Identifiers)1
- 文件扩展名(后缀)
关于UTI的例子:
public.text—A public type that identifies text data.
public.jpeg—A public type that identifies JPEG image data.
com.apple.bundle—An Apple type that identifies a bundle directory.
com.apple.application-bundle—An Apple type that identifies a bundled app.
在OS X中可以使用UTI来限制Open panel中展示的文件类型。
系统判定UTI类型的途径是判断文件扩展名。
如果你创建了自定义的文件类型,需要在系统注册应用程序来打开它。
Security: Protect the Files You Create
详见:《Secure Coding Guide》2
Sandboxes Limit the Spread of Damage
iOS的sandbox机制在阻止app修改系统文件系统的同时也防止了app之间的交叉修改。取而代之的是app之间只能读指定的container。
关于Mac的sandbox机制见 《App Sandbox Design Guide》3。
Perissions and Access Control Lists Govern All Access to Files
由ACLs(access control lists)和BSD permissions混合实现存储权限控制。详见《Security Overview》4。
因为iOS app总是在sandbox机制下运行,其app创建文件的ACL信息会被系统自动配置好。
访问控制表5(Access Control List,ACL6),又称存取控制串列,是使用以访问控制矩阵为基础的访问控制方法,每一个对象对应一个串列主体。访问控制表描述每一个对象各自的访问控制,并纪录可对此对象进行访问的所有主体对对象的权限。
对于服务器端的文件,不要旨意它有任何ACL/BSD权限控制信息。
对于面向service权限控制见《Identity Services Programming Guide》7
Files can be Encrypted On Disk
iOS 支持对指定文件进行加密。详见《App Programming Guide for iOS》。
Synchronization Ensures Robustness in Your File-Related Code
这里貌似并没有讲到iOS情况。
Files, Concurrency, and Thread Safety
又是线程安全:
| Class/Technology | Notes |
|---|---|
| NSFileManager | NSFileManager是线程安全的,但是要注意使用delegate的时候尽量使用一个实例完成操作。 |
| GCD | GCD自己是线程安全的,但是具体干啥就要自己保证了。 |
| NSFileHandle, NSData, Cocoa streams | 尽量保证对一个文件进行单线程读写操作。 |
| Open and Save panels | 你应该保证在一个时间只出现一个。 |
| POSIX routines | 线程安全。 |
| NSURL and NSString | immutable的变量是可以同时被多个线程安全的访问的。而mutable的变量应该采取线程同步方式访问。 |
| NSEnumerator and its subclasses | 单线程使用。 |
使用File Coordinators确保文件访问同步见下方的 The Role of File Coordinators and Presenters。
Accessing Files and Directories
包含文件检索和文件访问。
Choose the Right Way to Access Files
iOS提供的已知文件类型及其对应正确打开方式:
| File Type | Examples | Description |
|---|---|---|
| Resource files | Nib files Image files Sound files Strings files Localized resources |
resource files保存独立于代码的数据。详见《Resource Programming Guide》7。 |
| Text Files | Plain text file UTF-8 formatted file UTF-16 formatted file |
可以是ASCII或者是Unicode编码的非结构性字符序列。一般都可以直接load进NSString。详见《String Programming Guide》 |
| Structed data files | XML file Property list file Preference file |
结构化的字符序列,一般使用特定的字符分隔符。详见《Event-Driven XML Programming Guide》。 |
| Archive files | Binary files created using a keyed archive object |
Archive file保存的是带runtime state的object。对应unarchive还原操作。详见《Archives and Serializations Programming Guide》。 |
| File Packages | Custom document formats | 例如“.ZIP”。里面可以包含多余一个文件,但是对用户只表示为一个文件的形式。你可以使用NSFileWrapper来访问这些文件。 |
| Bundles | Apps Plug-ins Frameworks |
提供结构化代码保存方式。详见《Bundle Programming Guide》。 |
| Code files | Binary code resource Dynamic shared libaries |
就是常见的代码文件了,指各种格式。详见《Code Loading Programming Topics》。 |
| A file wrapper | A colltecion of files that appear as a single file |
用来串行读写。详见下方的 Using FileWrappers as File Containers。 |
以上方式不适用时,你可能需要使用第三方工具或者自己编写工具来读写特定文件了。详见下方的 Techniques for Reading and Writing Files Without File Coordinators
Specifying the Path to a File or Directory
使用NSURL或者NSString都可以标识文件/目录路径。
NSURL和CFURL是toll-free bridge关系,可以直接转换使用。
栗子:
Path-based URL:
file://localhost/Users/steve/Documents/MyFile.txt。方便操作和debug。File reference URL:
file:///.file/id=6571367.2773272/。不怕文件路径发生改变(注意:对于同一个文件,id会在系统重启后发生改变)。String-based path:
/Users/steve/Documents/MyFile.txt。不同系统可能使用不同的分隔符来划分层级目录,所以最好使用NSURL自带的方法来创建文件/目录标识object,然后在需要使用的时候调用absoluteString方法转出NSString。
因为NSString、NSURL仅仅是描述路径的字符串,所以他们可以在文件存在之前就创建好。也是因为这样,使用他们之前注意要确认文件是否存在。详见NSURL和NSString Class Reference。
Locating Items in the File System
Asking the User to locate an item
使用默认的Open and Save panel来让用户自己选择文件。
不要用app内部container使用Open and Save panel。
Locating Items in Your App Bundle
对于app bundle内部的文件定位。
bundle不仅帮你处理了文件操作命令,还帮你完成了语言本地化切换工作。
栗子(读取main bundle里面MyImage.png文件):
NSURL *url = [[NSBundle mainBundle] URLForResource:@"MyImage" withExtension:@"png"];
关于Bundle的详细内容见《Resource Programming Guide》8。
Locating Items in the Standard Directories
对于app container内部的文件定位。
使用框架提供的方法:
NSFileManager 的
URLsForDirectory:inDomians:检索NSSearchPathDirectory内容,包含指向各个标准目录的URL。NSSearchPathForDirectoriesInDomiansfunction 和上面一样,但是返回string-base path。NSHomeDirectoryfunction 返回 app home directory。
下面栗子检索Application Support目录:
- (NSURL *)applicationDataDirectory {
    NSFileManager *shareFM = [NSFileManager defaultManager];
    NSArray *possibleURLs = [shareFM URLsForDirectory:NSApplicationSupportDirectory inDomians:NSUerDomianMask];

    NSURL *appSupportDir = nil;
    NSURL *appDirectory = nil;

    if ([possibleURLs count] > 1){
        //Use the first directory (if multiple are returned)
        appSupportDir = [possibleURLs objectAtIndex:0];
    }

    //If a valid app support directory exists, add the
    //app's bundle ID to it to specify the final directory.
    if (appSupportDir){
        NSString *BundleID = [[NSBundle mianBundle] bundleIdentifier];
        appDirectory = [appSupportDir URLByAppendingPathComponent:appBundleID];
    }

    return appDirectory;
}
Locating Files Using Bookmarks
bookmark 永久链接,不受move和rename动作影响,不同于file reference 和 path。
栗子:
- (NSData *)bookmarkForURL:(NSURL *)url{
    NSError *theError = nil;
    NSData *bookmark = [url bookmarkDataWithOptions:NSURLBookmarkCreationSuitableForBookmarkFile includingResourceValueForKeys:nil relativeToURL:nil error:&theError];

    if (theError || (bookmark == nil)){
        //Handle any erros.
        return nil;
    }

    return bookmark;
}
使用NSURL的writeBookmarkData:toURL:options:error:会创建一个alias file,和symbolic links相似但是实现方法不一样。
转换回来的方法NSURL的URLByResolvingBookmarkData:options:relativeToURL:bookmarkDataIsStale:error:。
相关栗子:
- (NSURL *)urlForBookmark:(NSData *)bookmark{
    BOOL bookmarkIsStale = NO;
    NSError *theError = nil;
    NSURL *bookmarkURL = [NSURL URLByResolvingBookmarkData:bookmark options:NSURLBookmarkResolutionWithoutUI relativeToURL:nil bookmarkDataIsStale:&bookmarkIsStale error:theError];

    if (bookmarkIsStale || (theError != nil)){
        //Handle any errors
        return nil;
    }

    return bookmarkURL;
}
Core Foundation框架提供基于C的bookmark操作,详见CFURL Reference。
Enumerating the Contents of a Directory
Enumerating a Directory One File at a Time
循环遍历,返回enumerator。
虽然NSDirectoryEnumerator是抽象类,但是NSFileManager的方法可以用来直接获取具体的实例:
enumeratorAtURL:includingPropertiesForKeys:options:errorHandler:enumeratorAtPath:
想要跳过目录内不需要遍历的子目录,调用skipDescendents方法。
Enumerator不会主动去遍历symbolic links链接到的目录。
栗子:
NSURL *directoryURL = <#An NSURL object that containes a reference to a directory#>;

NSArray *keys = [NSArray arrayWithObjects:NSURLIsDirectoryKey, NSURLIsPackageKey, NSURLLocalizedNameKey, nil];

NSDirectoryEnumerator *enumerator = [[NSFileManager defaultManager]enumeratorArURL:directoryURL includingPropertiesForKeys:keys options:(NSDirectoryEnumerationSkipsPackageDescendants | NSDirectoryEnumerationSkipsHiddenFiles) errorHandler:^(NSURL *url, NSError *error){
    //Handle the error.
    //return YES if the enumeration should continue after the error.
    return <#YES or NO#>;
    }];

for (NSURL *url in enumerator){

    //Error checking is omitted for clarity.

    NSNumber *isDirectory = nil;
    [url getResourceValue:&isDirectory forKey:NSURLIsDirectoryKey error:NULL];

    if ([isDirectory boolValue]){
        NSString *localizedName = nil;
        [url getResourceValue:&localizedName forKey:NSURLLocalizedNameKey error:NULL];

        NSNumber *isPackage = nil;
        [url getResourceValue&isPackage forKey:NSURLIsPackageKey error:NULL];

        if ([isPackage boolValue]){
            NSLog(@"Package at %@",localizedName);
        }else{
            NSLog(@"Directory at %@",localizedName);
        }
    }
}
另一个栗子,使用enumeratorPath:方法,找24h内修改过的文件,跳过遍历rtfd文件包:
NSString *directoryPath = <#Get a path to a directory#>;
NSDirectoryEnumerator *directoryEnumerator = [[NSFileManager defaultManager] enumeratorAtPath:directoryPath];

NSDate *yesterday = [NSDate dateWithTimeIntervalSinceNow:(-60*60*24)];

for (NSString *path in directoryEnumerator) {

    if ([[path pathExtension] isEqualToString:@"rtfd"]) {
        // Don't enumerate this directory.
        [directoryEnumerator skipDescendents];
    }
    else {

        NSDictionary *attributes = [directoryEnumerator fileAttributes];
        NSDate *lastModificationDate = [attributes objectForKey:NSFileModificationDate];

        if ([yesterday earlierDate:lastModificationDate] == yesterday) {
            NSLog(@"%@ was modified within the last 24 hours", path);
        }
    }
}
Getting the Contents of a Directory in a Single Batch Operation
一次遍历完整个目录,返回NSArray。
两个方法可以用:
contentsOfDirectoryAtURL:includingPropertiesForKeys:options:error:contentsOfDirectoryAtPath:error:
如果只需要子目录,用:
subpathsOfDirectoryAtPath:error:
栗子:
NSURL *url = <#A URL for a directory#>;
NSError *error = nil;
NSArray *properties = [NSArray arrayWithObjects: NSURLLocalizedNameKey,
                          NSURLCreationDateKey, NSURLLocalizedTypeDescriptionKey,
nil];
NSArray *array = [[NSFileManager defaultManager]
                   contentsOfDirectoryAtURL:url
                   includingPropertiesForKeys:properties
                   options:(NSDirectoryEnumerationSkipsHiddenFiles)
                   error:&error];
if (array == nil) {
    // Handle the error
}
Determining Where to Store Your App-Specific Files
好像都是上面讲过的内容。
ApplicationSupport,CachesorTempdirectories这些文件夹一般不会share给其他app使用,所以不需要使用file coordinators。
通过NSFileManager的URLsForDirectory:inDomains:方法取得这些目录。
两个参数枚举类型是这样定义的:
enum {
   NSApplicationDirectory = 1,
   NSDemoApplicationDirectory,
   NSDeveloperApplicationDirectory,
   NSAdminApplicationDirectory,
   NSLibraryDirectory,
   NSDeveloperDirectory,
   NSUserDirectory,
   NSDocumentationDirectory,
   NSDocumentDirectory,
   NSCoreServiceDirectory,
   NSAutosavedInformationDirectory = 11,
   NSDesktopDirectory = 12,
   NSCachesDirectory = 13,
   NSApplicationSupportDirectory = 14,
   NSDownloadsDirectory = 15,
   NSInputMethodsDirectory = 16,
   NSMoviesDirectory = 17,
   NSMusicDirectory = 18,
   NSPicturesDirectory = 19,
   NSPrinterDescriptionDirectory = 20,
   NSSharedPublicDirectory = 21,
   NSPreferencePanesDirectory = 22,
   NSItemReplacementDirectory = 99,
   NSAllApplicationsDirectory = 100,
   NSAllLibrariesDirectory = 101,
};
typedef NSUInteger NSSearchPathDirectory;
enum {
   NSUserDomainMask = 1,
   NSLocalDomainMask = 2,
   NSNetworkDomainMask = 4,
   NSSystemDomainMask = 8,
   NSAllDomainsMask = 0x0ffff,
};
typedef NSUInteger NSSearchPathDomainMask;
Tips
- Lazy File Operation
- Use Secure Coding Practices
- Assume Case Sensitivity for Paths
- Include Filename Extensions for New Files
- Use Display Names When Presenting Items
- Accessing Files Safely from Background Threads
The Role of File Coordinators and Presenters
操作icloud的时候会用到。
多个objects想要操作/观察同一个文件时,把这些objects称为这个文件的presenters。file coordinator的作用是在文件被修改时及时通知这些object。
模型大概是这样:
- 当你的app需要修改一个文件的时候,创建一个file coordinator来发送消息给所有presenter。
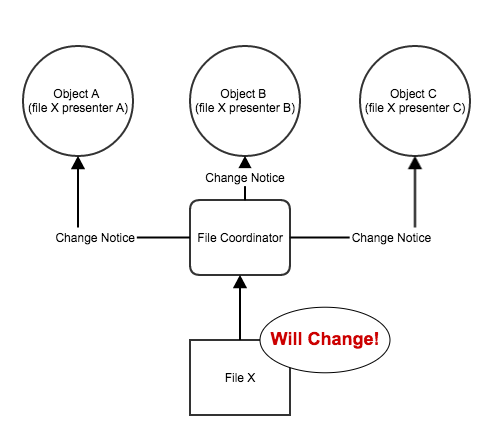
- 等所有presenter处理完通知消息之后,再进行修改。
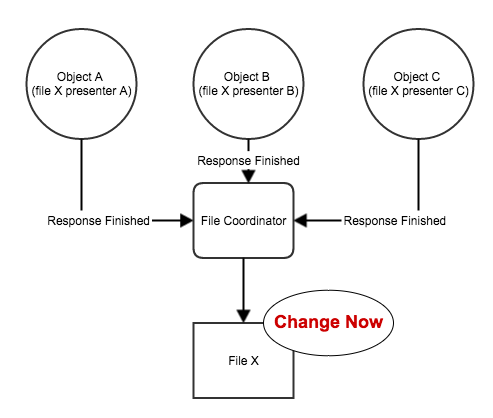
以上步骤都是异步进行。
Using UIDocument to Handle File Coordinators and Presenters
特性:
The NSFileCoordinator implementation
The NSFilePresenter implementation
The Autosave implementation
private files( Application Support, Cache, or temporary directories) 不需要使用file coordinator。
Ensuring Safe Read and Write Operations Using File Coordinators
代码实现file coordinator步骤:
- 对于每一个管理文件或目录的object,实现NSFilePresenter protocol。系统会通过这个protocol发送通知。
- 初始化file presenter object的时候向系统注册为file presenter。
NSFileCoordinator的addFilePresenter:。 - 当其中一个presenter操作文件的时候,创建一个NSFileCoordinator并调用相应的方法。
- 在class的
dealloc方法中调用removeFilePresenter:。
Choosing Which Files to Monitor with File Presenters
什么时候使用presenter(iOS):
- 手动处理iCloud上的用户文档
- 远程文件
因为iOS app自带sandbox机制,所以sandbox内的所有目录/文件操作都不需要使用presenter。
Implementing Your File Presenter Objects
- 提供指向被观察目录/文件的URL(
presentedItemURL) - 操作完文件/目录之后及时释放相关指针
- 在其他object尝试修改文件/目录前保存/放弃修改
- 文件/目录被移动/删除之后更新自己相应的数据结构
- 提供一个尽可能简单的dispatch queue作为presenter method
OS X中的NSDocument已经实现了File Presetner。
对changes(如presentedItemDidChange, presentedItemDidMoveToURL:, or accommodatePresentedItemDeletionWithCompletionHandler:)的响应可以考虑异步到一个dispatch queue里面处理,好让别的object的动作不受到影响。
但是relinquish(如relinquishPresentedItemToReader:, relinquishPresentedItemToWriter:, or savePresentedItemChangesWithCompletionHandler:)动作一般还是要同步执行,特别是有特定文件操作逻辑顺序的情况下。
protocol详情参考 **NSFilePresenter Protocol Reference **9
Registering File Presenters with the System
调用NSFileCoordinator的addFielPresenter:方法添加。
在dealloc方法中调用removeFilePresenter:。
Initating File Changes with a File Coordinator
file presenter在修改被观察文件/目录之前,必须先创建NSFileCoordinator然后声明修改的类型。file coordinator是系统级别的机制,可以在不同进程/线程之间发送同一个文件的change notice。
使用file coordinator的具体步骤:
- 创建一个NSFileCoordinator实例。
- 根据接下来要对文件/目录进行的修改,调用NSFileCoordinator相应的方法。
- 修改完之后释放file coordinar。
具体方法:
- 读
coordinateReadingItemAtURL:options:error:byAccessor: - 写
coordinateWritingItemAtURL:options:error:byAccessor: - 读写
coordinateReadingItemAtURL:options:writingItemAtURL:options:error:byAccessor: - 移动
itemAtURL:didMoveToURL: - 批量读写多个文件/目录
prepareForReadingItemsAtURLs:options:writingItemsAtURLs:options:error:byAccessor:
关于NSFileCoordinator见**NSFileCoordinator Class Reference **10
iCloud File Management
通过iCloud服务可以实现不同设备上的同一个app共享文件(包括用户和程序数据)。同时iCloud还能起到备份数据的作用。
OS X 在 Garbage collection环境下iCloud API不可用,需要转为ARC。
Storing and Using Documents in iCloud
使用iCloud的前提是用户本地已经有存在一个文件/目录,然后才能移动到iCloud。iCloud的同步机制也不是马上把本地文件直接同步到云端,而是先把文件cp到iCloud service管理的目录下再进行同步。
当一个设备中本地iCloud文件被修改时,iCloud会使用该文件的一个local daemon来push到云端。
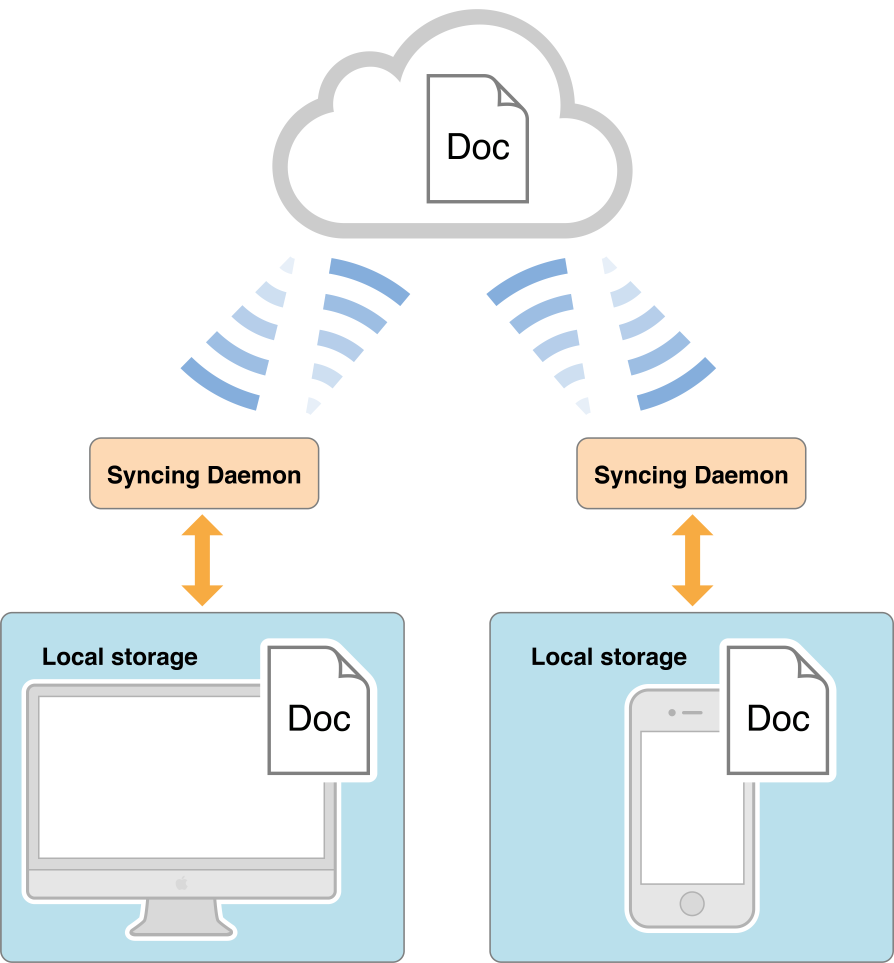
为了防止版本冲突,必须使用file coordinator,或者使用NSDocument/UIDocument来操作iCloud文件。
iCloud Storage APIs
iCloud API的用意并不是单纯用来在不同的设备之间传输文件,而是让同一个app在不同的设备(同一个apple ID)之间共享一些数据量比较小的用户信息/程序配置。
Working with Documents in iCloud
多个线程/进程/设备可以同时读iCloud的同一个文件,但是一个时刻只能存在一个写操作。
iCloud文件锁同步机制的核心就是file coordinator和file presenter。
这里file coordinator的作用在于协助你的app和后台的sync进程完成iCloud文件的同步锁机制。
而file presenter的作用在于object接收到来自file coordinator发来的文件变更通知的时候维护object自身的数据信息。
具体的实现步骤看前面章节。
操作iCloud 文件/目录 时尽量使用纯英文字母(或者尽量简单)并且区分大小写。
Moving a Document to iCloud Storage
步骤:
- 在本地目录创建文件/目录
- 如果你木有使用NSDocument/UIDocument,给文件创建对应的file presenter。
- 创建iCloud目录的NSURL指明文件在iCloud的存放位置。
具体是使用NSFileManager的URLForUbiquityContainerIdentifier:方法来获取当前文件的root URL,然后再append下级目录和文件名进来。 - 调用NSFileManager的
setUbiquitous:itemAtURL:destinationURL:error:方法移动到iCloud。
Searching for Documents in iCloud
使用NSMetadataQuery。
范围:
NSMetadataQueryUbiquitousDocumentsScope
搜索/Documents下的文件
NSMetadataQueryUbiquitousDataScope
搜索非/Documents下的Data文件(也就是前面说到的用户不能手动修改的那一部分用户数据,对应哪个container是application support那些)。
NSMetadataQueryAccessibleUbiquitousExternalDocumentsScope
Search for documents outside the app’s container. This search can locate iCloud documents that the user previously opened using a document picker view controller. This lets your app access the documents again without requiring direct user interaction. The result’s NSMetadataItemURLKey attributes return security-scoped NSURLs. For more information on working with security-scoped URLs, see Security-Scoped URLs in NSURL Class Reference.
步骤:
- 创建NSMetadataQuery object并设置搜索范围。iCloud search和本地搜索是分开的。
- 设置搜索predicate,如 NSMetadataItemFSNameKey == * 。
- 配置其他query参数,register query notification(如
NSMetadataQueryDidUpdateNotification,用来接受query结果)。 - 调用
startQuery方法。 - 配置并启动线程的runloop(main thread自带runloop所以不用创建)。
- 使用handler处理query结果(注意要先disable query result update,不然query结果有可能发生改变。处理完之后有需要再打开update)。
- 调用
stopQuery方法停止query。
详见 《File Metadata Search Programming Guide》11。
Working with File Wrappers
默认情况下iCloud并不会识别package为目录形式,需要如下设置:
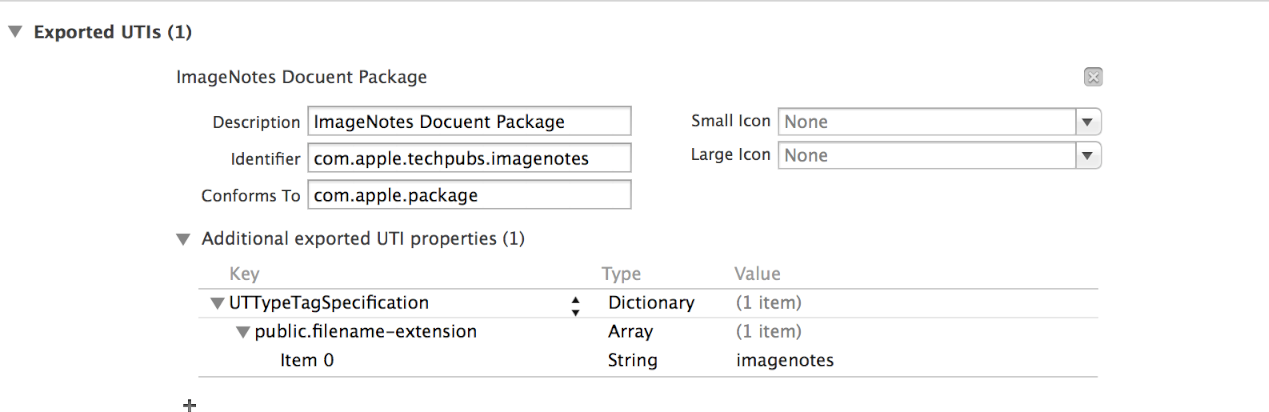
详见下方的 Using FileWrappers as File Containers 。
Handling File-Version Conflicts
To resolve conflicts:
- 使用
[NSFileVersion currentVersionOfItemAtURL:]取得当前本地文件版本号。 - 使用
[NSFileVersion unresolvedConflictVersionsOfItemAtURL:]获得conflict versions array。 - 对于每一个版本,执行正确的归并操作。尽量不要让用户做决定。
- 根据结果update local file
如果本地版本是最后的版本,不需要采取动作。
如果其中一个conflict version是最后结果,使用file coordinator来覆盖本地文件。
如果用户选择一个conflict version并希望在使用当前本地version的前提下保留它,直接创建一个新的给这个conflict version。 - resolved = YES; 消除iCloud侦测到的conflict状态。
详见 NSFileVersion Class Reference 12。
Using iCloud Storage Responsibly
iCloud免费空间有限,省点用……
删除本地copy使用NSFileManager的evictUbiquitousItemAtURL:error:,不会影响iCloud文件。你可以使用这个方法来迫使sync同步新版本文件。
/Documents的文件用户可见,可以单独删除里面的某个文件。而Data文件是一个整体,用户只能一次删除全部。
Using the Open and Save Panels
sandbox机制下的iOS app应该自动地把文件保存在正确的container里面,尽可能不要询问用户。
iOS 对应的应该是 UIDocumentPickerView。
Managing Files and Directories
重点终于来了……
文件和目录操作。
Creating New Files and Directories Programmatically
一般使用NSFileManager来操作,如果不满足的话可以考虑调用其他一些BSD文件系统层面的函数来实现。
文件系统操作的前提是app或者是具体的线程有相应的操作权限。
Creating Directories
NSFileManager的两个方法:
createDirectoryAtURL:withIntermediateDirectories:attributes:error:createDirectoryAtPath:withIntermediateDirectories:attirbutes:error:
区别是前者第一个参数传NSURL,而后者第一个参数传NSString Path。前者在OS X 10.7和iOS 5 之后才能用。
栗子:
- (NSURL *)applicationDirectory
  {
      NSString* bundleID = [[NSBundle mainBundle] bundleIdentifier];
      NSFileManager *fm = [NSFileManager defaultManager];
      NSURL *dirPath = nil;
      // Find the application support directory in the home directory.
      NSArray *appSupportDir = [fm URLsForDirectory:NSApplicationSupportDirectory inDomains:NSUserDomainMask];
      if ([appSupportDir count] > 0)
      {
          // Append the bundle ID to the URL for the
          // Application Support directory
          dirPath = [[appSupportDir objectAtIndex:0] URLByAppendingPathComponent:bundleID];
          // If the directory does not exist, this method creates it.
          // This method is only available in OS X v10.7 and iOS 5.0 or later.
          NSError *theError = nil;
          if (![fm createDirectoryAtURL:dirPath withIntermediateDirectories:YES attributes:nil error:&theError])
         {
              // Handle the error.
                return nil;
         }
      }
      return dirPath;
  }
也可以使用mkdir。
Creating New Files
包括:创建文件系统文件记录、写文件内容。
一次写入:(除了NSFileManager,还有很多class也自带了这个函数):
createFileAtPath:contents:attributes:(NSFileManager)writeToURL:atomically:(NSData)writeToURL:atomically:(NSString)writeToURL:atomically:encoding:error:(NSString)writeToURL:atomically:(Various collection classes define this method for writing out property lists.)open function with the
O_CREAToption creates a new empty file
Note: 所创建的文件的权限来源于当前用户和线程。
Copying and Moving Files and Directories
copy:
copyItemAtURL:toURL:error:copyItemAtPath:toPath:error:
move:
moveItemAtURL:toURL:error:moveItemAtPath:toPath:error:
两个动作的效果和finder一致,在一个分区内move不会创建新文件。在不用分区移动的话就和copy一样。
一个异步的栗子:
- (void)backupMyApplicationData {
     // Get the application's main data directory
     NSArray* theDirs = [[NSFileManager defaultManager]
  URLsForDirectory:NSApplicationSupportDirectory inDomains:NSUserDomainMask];
     if ([theDirs count] > 0)
     {
        // Build a path to ~/Library/Application Support/<bundle_ID>/Data
        // where <bundleID> is the actual bundle ID of the application.
        NSURL* appSupportDir = (NSURL*)[theDirs objectAtIndex:0];
        NSString* appBundleID = [[NSBundle mainBundle] bundleIdentifier];
         NSURL* appDataDir = [[appSupportDir URLByAppendingPathComponent:appBundleID] URLByAppendingPathComponent:@"Data"];
        // Copy the data to ~/Library/Application Support/<bundle_ID>/Data.backup
        NSURL* backupDir = [appDataDir URLByAppendingPathExtension:@"backup"];
        // Perform the copy asynchronously.
        dispatch_async(dispatch_get_global_queue(DISPATCH_QUEUE_PRIORITY_DEFAULT, 0), ^{
            // It's good habit to alloc/init the file manager for move/copy operations, // just in case you decide to add a delegate later.
            NSFileManager* theFM = [[NSFileManager alloc] init];
            NSError* anError;
           // Just try to copy the directory.
           if (![theFM copyItemAtURL:appDataDir toURL:backupDir error:&anError]) {
                // If an error occurs, it's probably because a previous backup directory // already exists. Delete the old directory and try again.
              if ([theFM removeItemAtURL:backupDir error:&anError]) {
                         // If the operation failed again, abort for real.
                        if (![theFM copyItemAtURL:appDataDir toURL:backupDir error:&anError])
                      // Report the error....
                         }
                }
          }
        });
      }
}
Deleteing Files and Directories
NSFileManager:
removeItemAtURL:error:removeItemAtPath:error:
删除之后就从文件系统消失了,木有回收站。
Creating and Handling Invisible Files
好像iOS木有用这个。
Techniques for Reading and Writing Files Without File Coordinators
比起Cocoa stream,POSIX 和 GCD 提供了更大的灵活性。
Reading and Writing Files Asynchronously
Cocoa stream 和 GCD 均提供异步读写方法。
Processing an Entire File Linearly Using Streams
Cocoa提供的stream读写类:
NSOutputStreamNSInputStream
需要运行线程有runloop。
详见《Stream Programming Guide》13
Processing a File Using GCD
GCD 提供三种读写文件的方式:
- dispatch I/O channel
- dispatch_read / dispatch_write 单文件异步读写
- dispatch source + POSIX 读写
Creating and Using a Dispatch I/O Channel
栗子:
先创建Dispatch I/O Channel
self.channel 是 dispatch_io_t 类型。
-(void)openChannelWithURL:(NSURL*)anURL {
   NSString* filePath = [anURL path];
   self.channel = dispatch_io_create_with_path(DISPATCH_IO_RANDOM,
                      [filePath UTF8String],   // Convert to C-string
                      O_RDONLY,                // Open for reading
                      0,                       // No extra flags
                      dispatch_get_main_queue(),
                      ^(int error){
                         // Cleanup code for normal channel operation.
                         // Assumes that dispatch_io_close was called elsewhere.
                         if (error == 0) {
                            dispatch_release(self.channel);
                            self.channel = NULL;
                         }
                      });
}
Dispatch I/O Channel支持从任何位置开始读写文件,stream只能从头读写到尾。
dispatch_io_read(self.channel,
                 1024,                        // 1024 bytes into the file
                 1024,                        // Read the next 1024 bytes
                 dispatch_get_main_queue(),   // Process the bytes on the main thread
                 ^(bool done, dispatch_data_t data, int error){
                     if (error == 0) {
                        // Process the bytes.
                     }
                 });
写操作使用 dispatch_io_write。
Manioulating Dispatch Data for an I/O Channel
所有IO Channel操作的数据都放在一个dispatch_data_t(buffer)数据结构里面。使用dispatch_data_create可以创建它,默认的创建操作是直接复制你提供的数据到buffer里面。
使用 dispatch_data_create_concat 可以append更多的数据到一个buffer里面。使用 dispatch_data_create_map 可以创建连续的buffers,提高连续读/写磁盘的性能(如果不是ssd的话……)。
使用 dispatch_data_apply 遍历所有 buffers 并提取其中的数据。
以下栗子创建了一个channel然后读取UTF8格式文本到NSString object里面。每一次读取1024b。
- (void)readContentsOfFile:(NSURL*)anURL {
   // Open the channel for reading.
   NSString*   filePath = [anURL path];
   self.channel = dispatch_io_create_with_path(DISPATCH_IO_RANDOM,
                       [filePath UTF8String],   // Convert to C-string
                       O_RDONLY,                // Open for reading
                       0,                       // No extra flags
                       dispatch_get_main_queue(),
                       ^(int error){
                          // Cleanup code
                          if (error == 0) {
                             dispatch_release(self.channel);
                             self.channel = nil;
                          }
                      });

   // If the file channel could not be created, just abort.
   if (!self.channel)
      return;

    // Get the file size.
    NSNumber* theSize;
    NSInteger fileSize = 0;
    if ([anURL getResourceValue:&theSize forKey:NSURLFileSizeKey error:nil])
        fileSize = [theSize integerValue];

   // Break the file into 1024 size strings.
   size_t chunkSize = 1024;
   off_t  currentOffset = 0;

   for (currentOffset = 0; currentOffset < fileSize; currentOffset += chunkSize) {
      dispatch_io_read(self.channel, currentOffset, chunkSize, dispatch_get_main_queue(),
                     ^(bool done, dispatch_data_t data, int error){
                        if (error)
                           return;

                        // Build strings from the data.
                        dispatch_data_apply(data, (dispatch_data_applier_t)^(dispatch_data_t region,
                                               size_t offset, const void *buffer, size_t size){
                           NSAutoreleasePool* pool = [[NSAutoreleasePool alloc] init];
                           NSString* aString = [[[NSString alloc] initWithBytes:buffer
                                         length:size encoding:NSUTF8StringEncoding] autorelease];

                           [self addString:aString toFile:anURL];  // Custom method.
                           [pool release];
                           return true;  // Keep processing if there is more data.
                        });

                     });
    }
}
Reading and Writing Files Synchronoulsy
Building Your Content in Memory and Writing it to Disk All at Once
小数据量一次写入,直接使用自带的writeTo之类的方法。
对于自定义类型的文件可以使用NSData或者NSMutableData来保存数据。
writeToURL:atomically:writeToURL:options:error:option字段可以声明是否加密文件
读取
initWithContentsOfURL:options:error:
Thus, if you used a keyed archiver to create the data object, you can use a keyed unarchiver to re-create your object graph. If you wrote the data out piece by piece, you can parse the byte stream in the data object and use it to reconstruct your document’s data structures.
Reading and Writing Files Using NSFileHandle
使用NSFileHandler。
步骤:
- 创建FileHandler
- 通过filer handler read/write until finish
- close file handler (release file handler的时候自动关闭)
栗子:
- (NSData*)readDataFromFileAtURL:(NSURL*)anURL {
     NSFileHandle* aHandle = [NSFileHandle fileHandleForReadingFromURL:anURL error:nil];
      NSData* fileContents = nil;
      if (aHandle)
          fileContents = [aHandle readDataToEndOfFile];
      return fileContents;
  }
详见 NSFileHandle Class Reference14
Managin Disk Read and Writes at the POSIX Level
直接用C的POSIX函数:
- 先打开文件
open - 读操作
preadreadreadv - 写操作
pwritewritewritev - 定位文件
lseek - 关闭文件
pclose
某些文件系统和网络文件系统不会保证写入结果完全正确,可以考虑使用fsync然后判断close是否正确(return TRUE)。
- (NSData*)readDataFromFileAtURL:(NSURL*)anURL {
    NSString* filePath = [anURL path];
    fd = open([filePath UTF8String], O_RDONLY);
    if (fd == -1)
        return nil;
    NSMutableData* theData = [[[NSMutableData alloc] initWithLength:1024] autorelease];
    if (theData) {
        void* buffer = [theData mutableBytes];
        NSUInteger bufferSize = [theData length];
        NSUInteger actualBytes = read(fd, buffer, bufferSize);
        if (actualBytes < 1024)
            [theData setLength:actualBytes];
}
close(fd);
    return theData;
}
系统允许一个app同时使用的file handler是有限的,用完之用记得close。
File descriptors 不仅仅用来打开文件,还用在communications channels(如:sockets、pipes)。由于高级框架自动帮你完成这些file descriptors的创建和时候,你平时可能不太能feel到它的存在。如果你在一个时间自己使用过度,就会对这些使用file descriptors的框架产生影响。
Getting and Setting File Metadata information
文件属性读写。
文件属性包含:文件大小、创建时间、持有者、权限信息等。
常用读写方式:
- 使用NSURL的
getResourceValue:forKey:error:setResourceValue:forKey:error:setResourceValues:error: - 使用NSFileManager的
attributesOfItemAtPath:error:setAttributes:ofItemAtPath:error:
Using FileWrappers as File Containers
NSFileWarpper可以直接在内存封装文件/目录/软链接,同时可以读写disk内容或者传给其他app(OS X)。
file wrapper的三种类型:
- 常规file wrapper,只封装一个文件。
- Directory wrapper,封装一个目录及其内部所有文件及子目录。
- link wrapper,封装一个symbolic link in the file system
因为file wrapper旨在在内存中保存文件,它并不保存文件URL。如果你需要从磁盘update wrapper里面的文件,就要自己保存文件URL。
NSFilerWrapper里面的文件可以被filer coordinator监控,并且是封装的所有文件。
Working with File Wrappers
创建:
- 直接使用内存数据创建
initWithSerializedRepresentation: - 使用文件系统中的文件创建
initWithURL:options:error:
指定wrapper类型创建:
initRegularFileWithContents:initDirectoryWithFileWrapper:(可以包含多个类型的wrapper)initSymbolicLinkWithDestination:
subclass的时候要适当的重写这些init方法,设置正确的wrapper类型信息。
判断类型:
isRegularFileisDirectoryisSymbolicLink
file wrapper在存储文件的同时也保存了文件系统信息,如修改时间和权限信息。这些信息会在你从文件系统读取/更新的时候赋值/更新。使用fileAttributes方法可以返回这些信息。使用setAttributesOfItemAtPath:error:可以修改这些信息。
NSFileWrapper中的preferredFilename和filename返回保存时候的文件名。
使用writeToURL:options:orginalContentsURL:error:把wrapper内容写到磁盘。
使用matchesContentsOfURL:方法判断本地磁盘文件是否和wrapper内文件一致(判断文件的最后修改时间)。然后使用readFromURL:options:error:可以re-read该文件。
serializedRepreesentation:方法返回NSFileContentsPboardType类型的NSData,方便传到别的app(然后再使用NSFileWrapper的initWithSerializedRepresentation:方法还原)。
Working with Directory Wrappers
Directory Wrapper(通过NSDictionary来实现)可以包含任何类型的wrapper,然后通过preferred filename来检索。
addFileWrapper:添加removeFilerWrapper:移除addRegularFileWithContents:preferredFilename:addSymbolicLinkDestination:preferredFilename:可以添加其他类型。
有三个方法可以检索Directory Wrapper中的文件:
- Preferred filename
- Dictionary key 如果一个Directory Wrapper里面木有preferred filename同名,则该值和preferred filename一样。如果有同名,则自动添加prefix string到preferred filename作为dictionary key。取key方法
keyForFileWrapper: - Filename 一般基于preferred filename,但不一定和preferred filename或者dictionary key相同。如果一个file wrapper被添加到其他filewrapper,则被保存的时候filename可能会改变。在使用的时候再取,不要Cache它。